DIY ski pulk
Pulk: Finnish for small cargo sled
January, 2014
I have wanted my own pulk after going on several yurt trips and had to rent or borrow a sled. After witnessing sleds pulled with ropes overturn on descents and/or sleds overtaking the skier and causing amusing wipeouts, I knew I wanted rigid poles. A comfortable harness and a minimal amount of fore and aft movement while ascending or descending was required as well. I blatantly stole ideas from commercial systems and home builders. The goal was to spend around $100, it was close. Costs, photos and links below.
Parts:
- Sled. My choice was the lightweight Paris Expedition Sled, I paid $43.76 including shipping. Other options include the Emsco Beast, Shappell Jet/Jet Jr Sleds, Pelican, Otter, cheap kiddie sled, etc.
- Poles. Six foot fiberglass 1/2" poles, flexible, difficult to break, relatively cheap at $3/each but the shipping to Utah is expensive, four poles for $40, two poles for $34. I ordered four poles and will sell the other two for $20. I'm calling my cost $20.
- Pole hardware. I decided on 1/2"-20 thread female ball joints (also called Heim or Rose joints) for both ends, mostly because of the price of female ball joints was considerably less than regular rod end hardware. The ball joints I used had a threaded length of 1 1/16" (normal, right hand threads) and would fit on the poles after cutting threads in the fiberglass, four ball joints were $19. Obviously, the female ball joint thread pitch dictates the size die you use to cut the threads. Note that the eye of the joint was 1/2" across.
- Harness. Padded LBE (load bearing equipment) surplus is widely available thanks to the US military, I purchased a US Army Molle molded waist belt (with sweet desert camo motif) from Amazon for $8.25, no-cost shipping due to use of the free Amazon Prime trial.
- Harness hardware. I used two oval biners I had on hand. Free.
- Sled hardware. The poles are connected to the pulk via cheap spinning casters from Home Depot, non-spinning casters would be better (I should have used them) as the ball joints provide horizontal plane movement. I removed the wheels and replaced the axle with steel wired safety pins the same diameter. I did have to pad the pins with cheap vinyl tubing so the ball joint rod ends had zero play once connected to the pulk. Bolts, nylock nuts and a small steel plate were also purchased. I fabricated the backing plate using a dremel and a drill but you could probably use tin snips and a drill. I spent about $18.
- Sled straps. One inch webbing, ladder lock side release buckles (find buckles that adjust from both the male and female sides!) and webbing slides - I spent $15. In hindsight I would have just threaded longer pieces of webbing through the holes in the pulk and not used slides unless the buckles dictated. This could easily come in under $10.
- Misc. I had 2 ton Devcon epoxy from another project, I already own a dremel tool, drill, bits, and cheap SAE tap/die thread-cleanup kit from Harbor Freight. (HF regularly has this kit on sale for $15.) I also had a short section of 2x4 scrap lumber, and staples for the die handle jig. Free.
Summary of my (2014) costs and links to parts
- $19.00 Four ball joint rod ends, female, 1/2"-20, 1/2" eye, 1 1/16" thread length
- $20.00 Two 6 foot, 1/2" fiberglass rods
- $ 8.25 One US Army Molle padded waistbelt
- $43.75 One Paris Expedition Sled
- $15.00 1" Nylon webbing, buckles, webbing slides from local outdoor shop
- $18.00 Various bolts/nuts/casters/steel sheet/vinyl tubing from Lowes/Home Depot
- $ 0.00 Already had two AustriAlpin biners where gate would fit through rod end ball joint
- $ 0.00 Already had drill, bits, Dremel, epoxy, vice, 2x4 scrap, cable staples
- $ 0.00 Already had this 40 Piece SAE HF Tap/Die set
- ----------------------------------------------
- $124.00 Total
Images with descriptions
Click images to enlarge

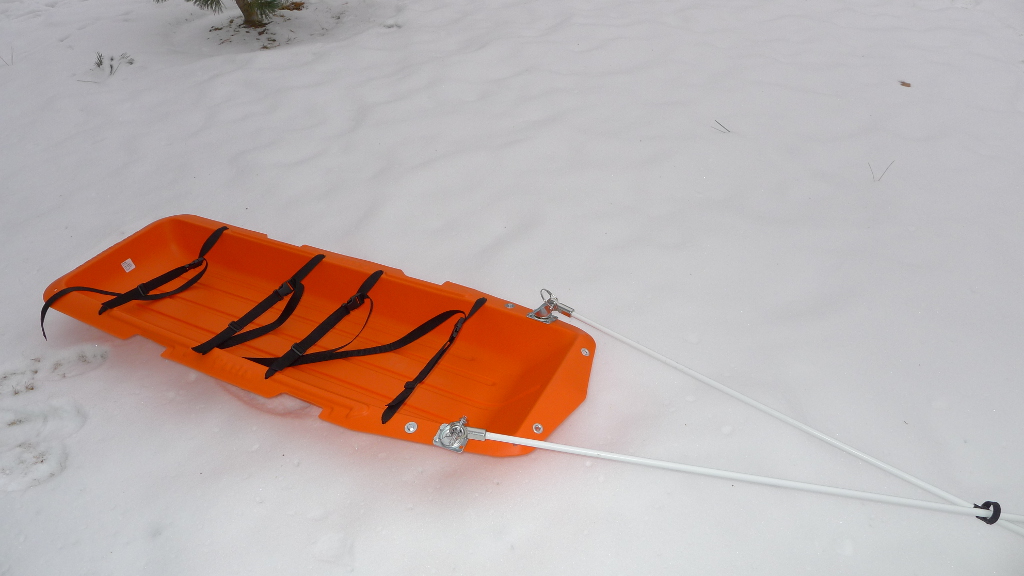
This is the pulk, with straps/buckles and attachment hardware installed. Most pulk builders agree that two or three bolts through the sled is probably not sufficient for heavy loads pulling against the caster attached to the sled. I fabricated a crude steel plate and installed it underneath the sled rails with bolts and nylock nuts, I also installed an additional bolt/washer/nylock nut through sled plastic and steel plate for increased strength.

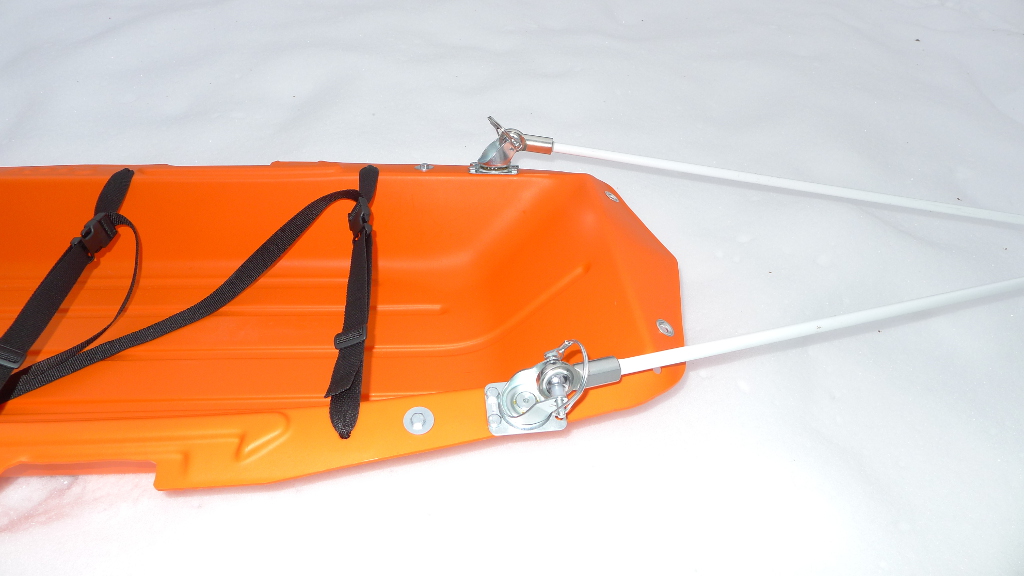
Shown is the top of the pulk, casters attached to sled and metal plate below the top rail, the ball joint eye is attached via steel pin with vinyl tubing to pad steel pin for play-free connection. (I didn't feel like drilling the axle hole in the caster for a larger diameter pin.) Vinyl tubing is sold by the foot at Lowes, Home Depot only had pre-cut lengths for sale - lame.
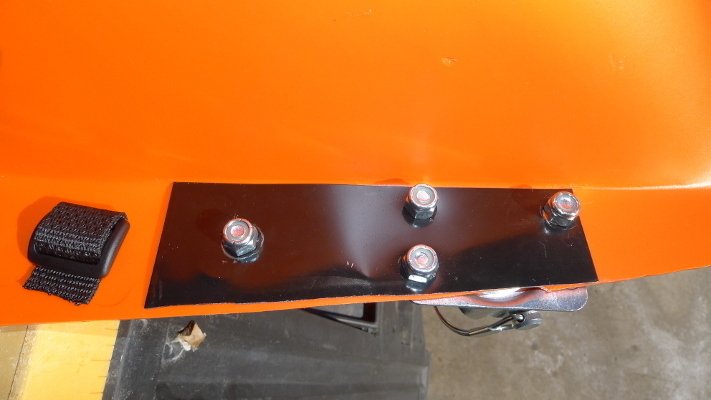
Plate underneath the top rail of the pulk. Plate was simply a sheet of steel, cut with a dremel, holes drilled, then spray-painted to prevent rust. On the left is a webbing slide that blocks the webbing from coming out of the hole. Note to self, don't do this, use longer webbing and the pre-existing holes to thread one piece to form a "U". (Use the 8 holes in the sled, 4 holes on each side, 4 pieces of 4-5' webbing.)

The 6 foot long, 1/2" fiberglass poles are used for electric fences, they come with one end sharpened to a point. I wanted the maximum surface area to join the fiberglass and ball joint fittings so I cut off the pointed ends with the dremel, wear a mask for the fiberglass dust.

This is the jig I used to keep the pole perpendicular to the die when cutting the threads, it is simply a 8" long 2x4 with a 1/2" hole drilled straight through the long side. I used cable routing staples to secure the die holder to the jig but zip ties might work. I centered the holder with the die over the hole (it should self-center.) Make sure the die holder lies flat on the narrow side of the 2x4. Be sure to wear gloves to avoid itchy fiberglass slivers. DAMHIK.

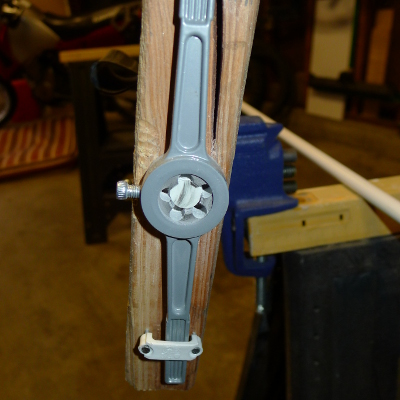
This is the jig with die and holder attached, start the thread cutting by pressing in on the jig/die while turning clockwise. A large vise padded with rubber/old bike tubes is recommended. My smallish, cheap-ass vise was no match for the spinning force on the fiberglass rod, much anti-spin muscle was needed to cut the threads. Remember to back off the jig after each turn and reverse to get neat threads. The 6' poles are long enough that if you botch the threads you could cut them off and try again, make sure both poles are the same length in the end.

Shown is the fiberglass rod end after cutting the threads 1 1/16" long, which is the thread length of the female ball joint fittings. Note that it is faster if you start the thread cutting with the jig, then remove the die and handle to finish the threads.
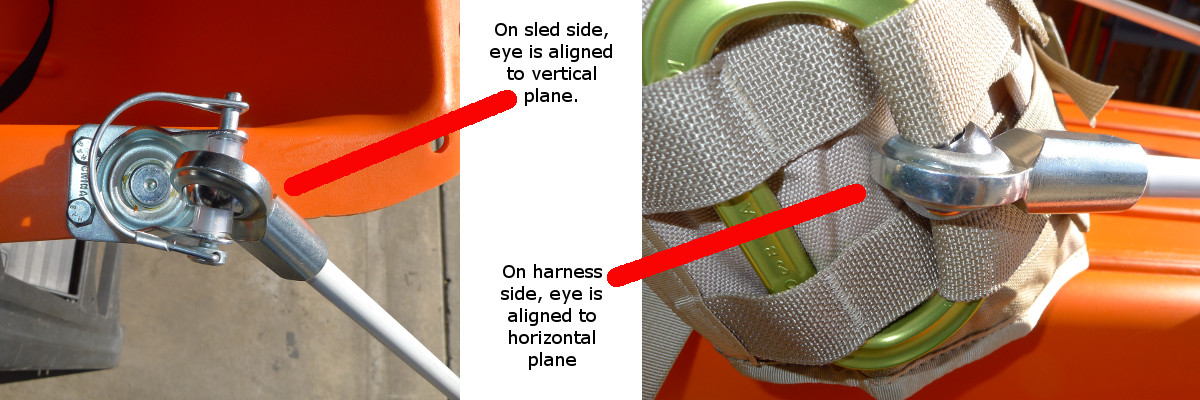
Important note - because the ball-joints will be epoxied to the fiberglass rods, I needed to decide the plane of the ball joint eyes. Commercial pole eyes are inline. I wanted one end offset 90 degrees from the other due to my harness setup. I cleaned the ball joint ends with rubbing alcohol then dry-fitted them to the fiberglass rods and marked the (offset) positions with a sharpie. My goal was to have all attachment points free of any play for efficiency.

Apply a sufficient amount of (but not too much) epoxy to the ball joint threads and screw on the ball joints noting the proper plane. The female ball joints I used have a small hole between the thread chamber and the ball joint, this means that excess epoxy could ooze into the fitting where the ball rotates, I inserted a toothpick wrapped in paper towel in the hole from the top and didn't have any problems. I used good epoxy with a 8 hour minimum cure time. 5-minute epoxy might not be sufficient, or it might be fine. (Just use the good stuff.)

Attachment of the rods to the harness was not the best solution but it works, I threaded a biner with the spine through the ice-clipper-type webbing loops, the ball joint eyes were too narrow to travel around to the biner spine so they were attached to the gate. The biner gates were "locked" by having the horizontal webbing threaded around the gate top and bottom with the built-in webbing/buckles on the harness.
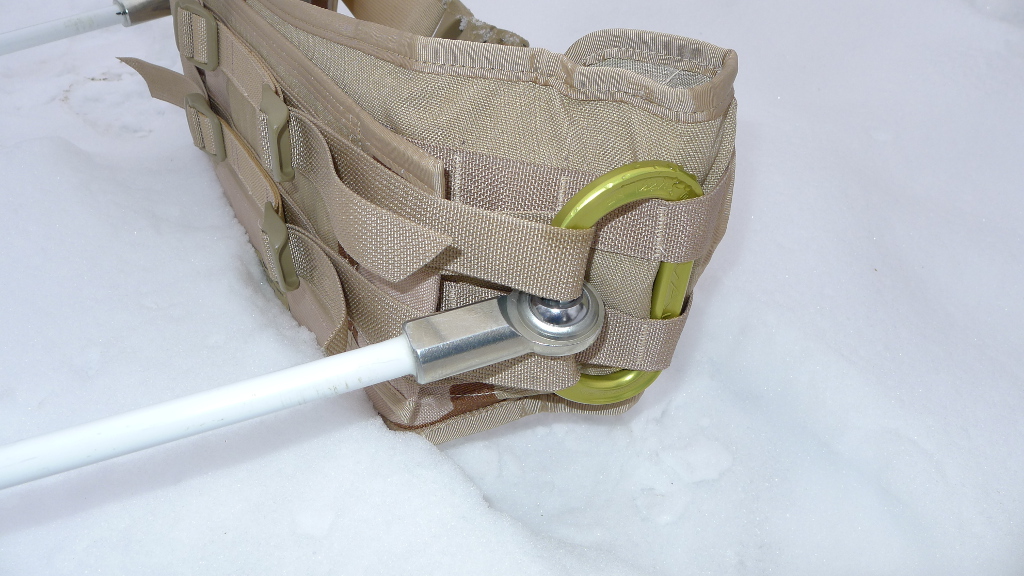
Biners locked in by webbing built into the harness. There is enough room for the poles to cross behind the harness for pulk tracking and stability. (Be sure to coss the poles, it keeps the sled from overturning on side hills!)
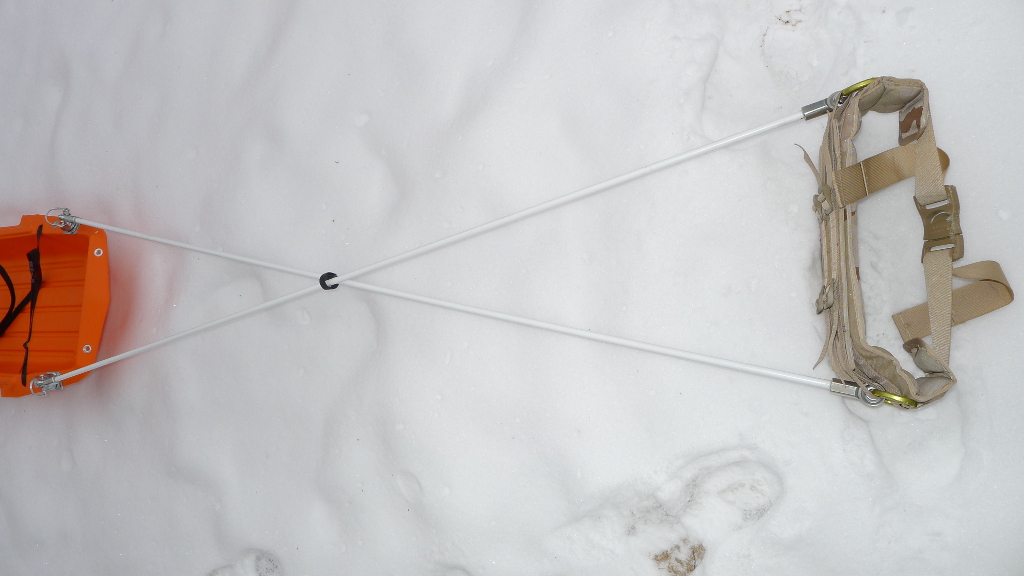

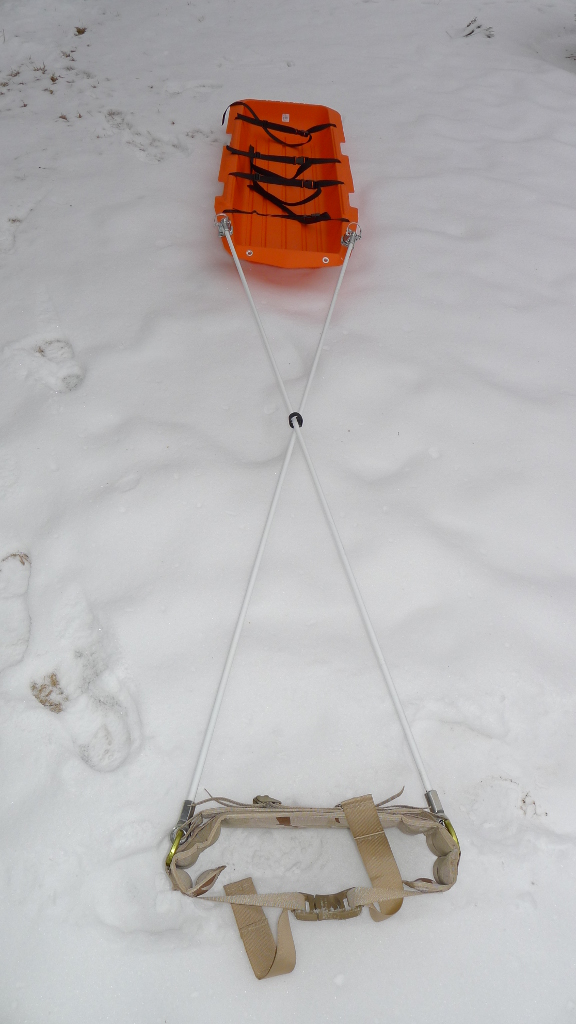
Completed pulk
Links:
- The Pulk Handbook from skipulk.com, a local copy is archived here as they have removed links to the PDF.
- Excellent commercial pulks, Skipulk.com. Most of my ideas were from their pulk handbook or their Paris design. Note that time-wise it might be cheaper to buy their pole kit but where is the fun in that?
- Wilderness Engineering makes a super nice, slippery, expensive ($500+) pulk and simple but effective steel pole attachment system. The U of U outdoor rec program rents them for around $30/day
- Norwegian site with great plans for retractable fins (skegs) that would keep the pulk from sliding out on side hills. Archived skeg photo here, template here.
- Laughing Dog blog, nicely done but a lot of fabrication.
- Wildsnow put together pulks for their successfull Denali bid, build post and good summary of how their gear performed. Summary - they chose excellent Wilderness Engineering sleds but their pack attachments and pole hardware choices didn't work as well as expected.
Approximate weights
- 3 lbs Poles with hardware attached
- 6 lbs Sled with hardware attached
- 2 lbs Harness and carabiners
- ------------------------------------------
- 11 lbs Total (5kg)
Conclusion
The pulk works well, there is zero fore and aft movement, this means it is less tiring to haul. The wide, padded harness is comfortable and the quick release buckle is nice to have as opposed to a climbing style harness webbing overlap attachment. The sled tracks well downhill, but lightening the load by putting some weight on your back makes it easier to ski down steeper hills.
Thoughts, criticisms or questions can be addressed by following the "Contact" link at Utahclimbers.com